Now let’s have a look at meta tags and how to use them.
When you send a link to your website via messengers or social media, it is generated automatically and does not always look user-friendly. Setting up meta tags allows you to customise links to your website, in particular to the Picvario workspace. By using tags, you choose what information will be displayed in the link to your workspace.
This is what a Picvario link looks like when it is generated automatically, before you set up meta tags. It has general wording that does not say anything about your brand. And no image.
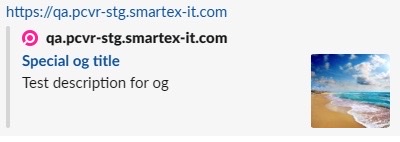
The customised link is identified straight away as your company’s media library.

How to set up meta tags
- To set up meta tags, click on the Profile icon — System settings.
- In the menu that opens, click on Appearance.
- Then click on Add Fields to add meta tags. This will bring up two fields: key and value.

The Key field is for meta tag names, Value is for meta tag values.
There are two main types of tags: Open Graph tags (og) and Twitter card tags (twitter).
Open Graph is used by most social networks and messengers (Facebook, Telegram, WhatsApp and others). Twitter has its own tags, but if not filled in, OG tags can be used if available. Find out more about the two types of tags here.
You can read more about meta tags by following the links below
The following meta tags have been tested and work for Picvario:
Open Graph
| og:type | The type of object you are sharing. (e.g., article, movie, website, etc.) The default value is website. |
| og:site_name | Allows the specified website name to be displayed instead of the domain name. |
| og:url | The URL of the content. Setting this tag allows the user to be redirected to a canonical page, without any extra parameters. For example, https://yoursite.com/page.html? param=value becomes https://yoursite.com/page.html |
| og:image | Image link. |
| og:title | Sets the page title. |
| og:description | Brief description of the page, sub-title. |
| twitter:card | Required element which indicates what type the card belongs to. The default value is summary. |
| twitter:image | Image link. |
| twitter:title | Sets the page title. |
| twitter:description | Brief description of the page, sub-title. |
| twitter:url | The URL of the content. Setting this tag allows the user to be redirected to a canonical page, without any extra parameters. For example, https://yoursite.com/page.html? param=value becomes https://yoursite.com/page.html |
Let’s have a look at an example of filling in the basic tags, namely title, description and image.
| Key | Example value | Note |
| title | Test description for og | Page title |
| description | Special og title | Brief description of the page |
| og:image |
| Link to the image to be displayed in the link |
In og:image you must specify a direct link to the image, which can be created directly in Picvario. Read how to do that here.
The following parameters are recommended for images:
— Open Graph — the minimum image size is 200 x 200 px. We recommend using images of at least 1200×630 px for best display on high resolution devices. File size is 8 MB max. More detailed Facebook guidelines can be found here.
— Twitter — from 300×157 px to 4096×4096 px. Formats: JPG, PNG, WEBP and GIF. If GIF is animated, only the first frame will be displayed. Maximum file size 5 MB. Read more about Twitter’s guidelines by following this link.
This is what the link will look like after configuring meta tags from the example above.

 Meta tags values are cached in browsers and messengers memory. To see the changes clear your system cache or open the link using «incognito» mode.