The system makes it possible to create and configure asset access rules for a specific user, group of users or organization.
 Access rules can be created by users who have Picvario Administrator permissions.
Creating Access Rules
To create an access rule, open the system admin panel.
Find the PERMISSIONS section. Click on the Rules subsection name or use the Change link.
In the list that appears, all existing access rules for your Picvario workspace will be displayed.
Click ADD RULE+ in the top right corner:
This opens the page for creating a new access rule:
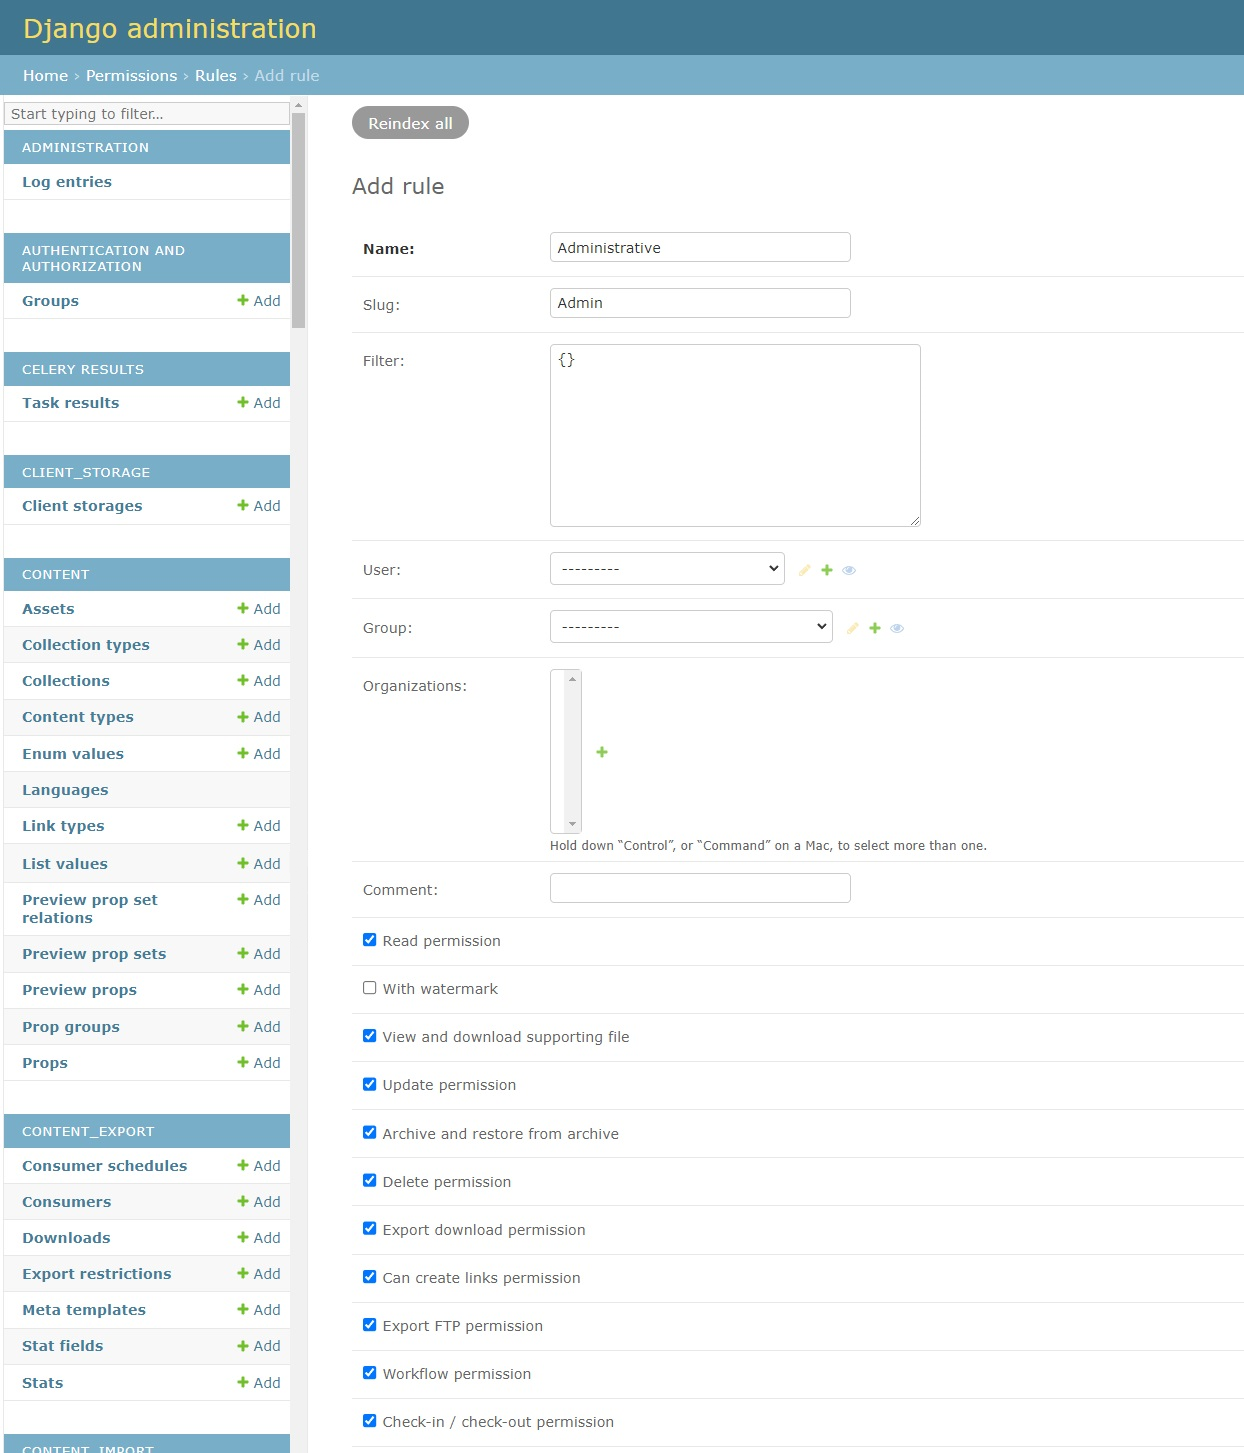
Group fields:
- Name. The access rule name. This field is mandatory.
- Slug. Symbol code of the group. If you leave this blank when creating it, the field will be filled in automatically.
- Filter by asset properties. The field specifies an access rule in JSON format. The rule can be specified by asset name, tags, public availability, properties. This field is mandatory.
Examples:
- {} — the access rule applies to all assets, the field is considered blank.
- {«title»:»USA»} — the access rule applies to assets with the name USA.
- {«prop__public»: false} — the access rule applies to all non-public assets.
The value of the filter already entered by the administrator can be copied in JSON format if you enter the required filter in the drop-down menu of the advanced search for assets on the public page.
- User. The user to whom the rule will apply. Select an email address from the list. If you don’t select an email, the rule will apply to all users.
- Group. The user group to which the rule will apply. Select the name of the group from the list. If you don’t select user and group email, the rule will apply to all users.
- Owner. The user who created the rule. Select your email address from the list. This field is optional.
- Organizations. The organization to which the rule will apply. Select the name of the organization from the list.
Available permissions for the rule:
Read permission. The read permission allows the user/group/organization to view assets.
With watermark permission. If Read permission is checked, the permission allows to view assets with watermarks.
Show proxies without generated versions with watermark: If Read permission and With watermark are activated, this permission allows the user/group/organization to view proxy versions of assets in case a proxy version with a watermark has not been generated for them (for example, if a watermark was added to the system later than the assets were imported). If it is necessary for the user/group/organization to see only assets with watermarks, enable With watermark, and leave Show proxies without generated versions with watermark disabled. Then, instead of a thumbnail or preview, the user will only see an icon with the asset format.
View and download supporting file. The permission allows you to view and download supporting files.
Update permission. This permission allows the user/group/organization to edit the asset properties on the right sidebar.
Archive and restore from archive. The permission to archive and restore files from an archive allows a user/group/organization to archive files by adding them to tape storage and restore archived files. Active only when the Update permission is active.
Delete permission. The delete permission allows the user/group/organization to delete assets.
Can create direct links permission. This permission allows creating direct links to assets and collections.
Export download permission. The export permission allows the user/group/organization to download the original high-resolution asset.
Export Export FTP permission. The permission allows the user/group/organization to export assets to FTP servers.
Workflow permission. The permission allows the user/group/organization to run system workflows.
Check-in / Check-out permission. The permission allows the user/group/organization to extract and return files. Active only when the Export download permission is active.
 If a user/group/organization has multiple permissions to access the same assets, they all apply.
- Is system
 False: this means that the access rule is not a system rule. You can only create non-system access rules. Access rules marked with the is_system flags
  are pre-configured for correct functioning of the system.
![]() By default, all new users get into the Unverified group with read with watermark permissions.
By default, all new users get into the Unverified group with read with watermark permissions.
System access rules
There are two access rules in Picvario: Public and Owner.
The Public rule defines access rights for unauthorized users. By default, this is the right to view public assets.
The Owner rule defines access rights for the owner of the asset (the user who uploaded it). By default, this is the full set of rights.
Creating import permission
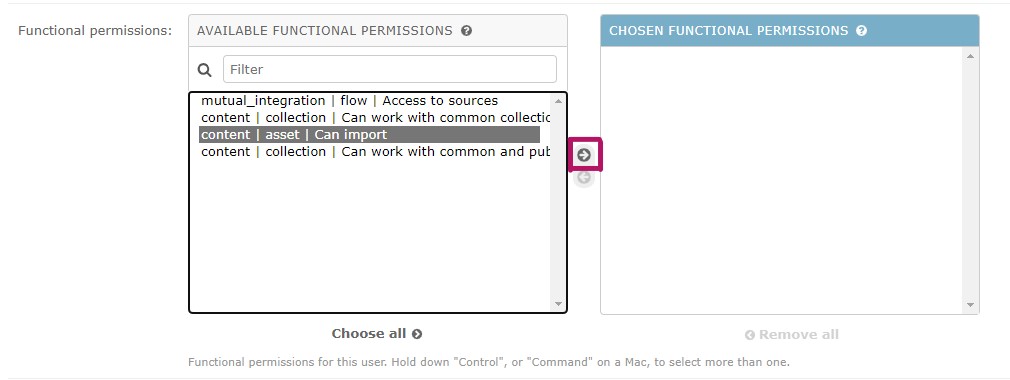
Import permission allows users to upload files into the system. To create import rule for a group of users go to Home > Authentication and Authorization > Groups. Choose the necessary group by clicking on it. In the Functional Permissions window find content | asset | Can import, select it and click the right arrow to move the rule to the Chosen permissions.
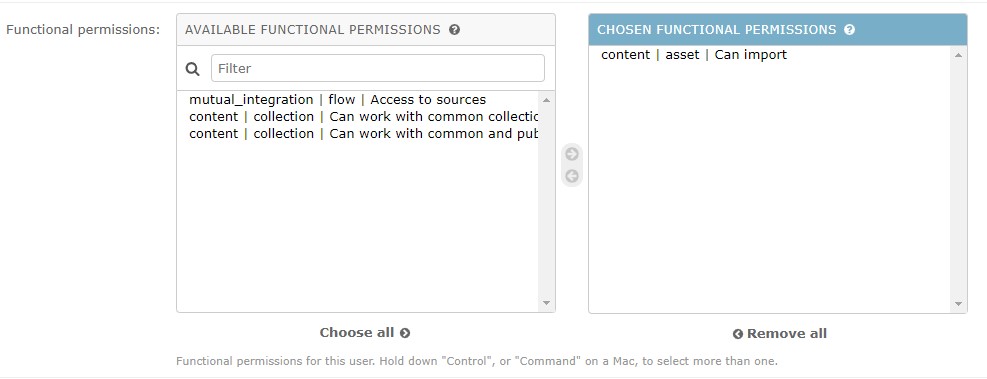
Click Save.
To create import rule for a single user go to Home > Users > Users. Choose the user by clicking on it, locate the Functional permissions window and repeat the actions above.
Working with collections permission
By default, a user can work only with the collections they created (for example, during the asset import process). To work with common and public collection, users need special permission.
The permission can be set up for both a group and an individual user.
The permission setting for a group is controlled in the admin panel > Home > Authentication and Authorization > Groups. Choose the necessary group by clicking on it. In the Functional Permissions window find content | collection | Can work with common collections and content | collection | Can work with common and public collections, select it and click the right arrow to move the rules to the Chosen permissions.
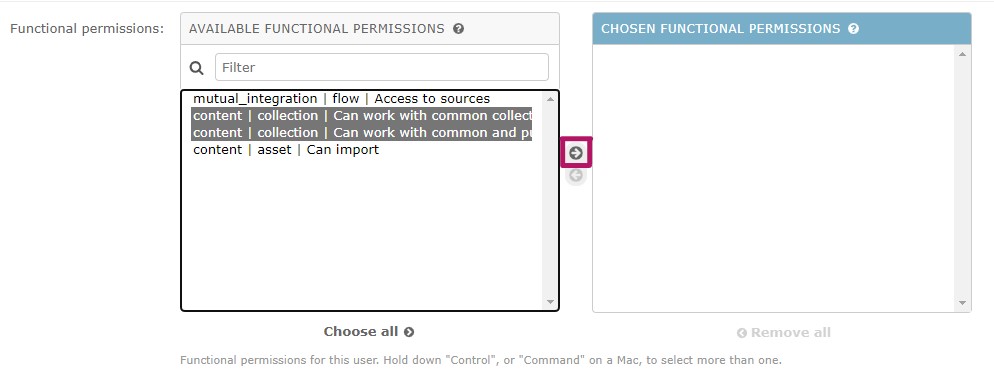
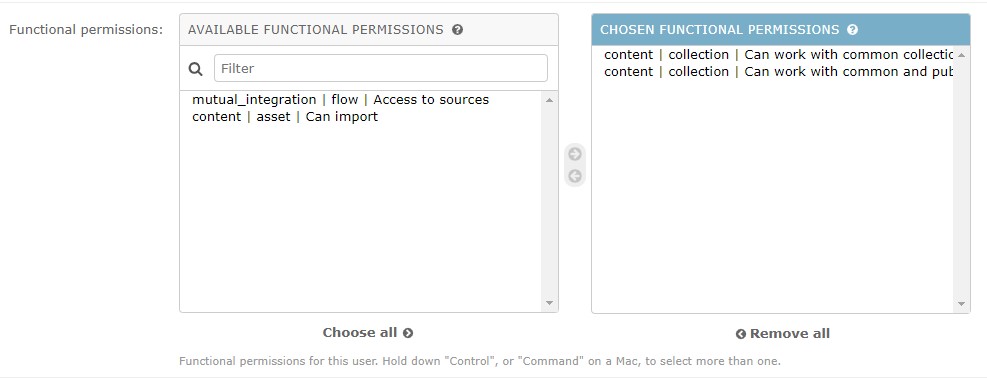
Click Save.
Actions that can be taken with different settings:
Owner of a collection WITHOUT BOTH PERMISSIONS:
- You can create and work with your own collections,
- You cannot change the collection to public or common,
- You cannot add or remove assets from common and public collections,
- Cannot change the main asset in common and public collections.
Owner of a collection WITH common PERMISSION:
- You can make your collection common,
- You can work with common collections (edit properties and delete),
- You can add or remove assets from common collections,
- You can change the main asset in common collections,
- You cannot change the collection type to public.
Owner of a collection WITH common AND PUBLIC PERMISSION:
- You can make your collection public or common,
- You can work with common collections (edit properties and delete),
- You can work with public collections (edit properties and delete),
- You can add or remove assets from common and public collections,
- You can change the main asset in common and public collections.
The administrator can:
- See all collections, including other users’ private collections,
- Work with all collections,
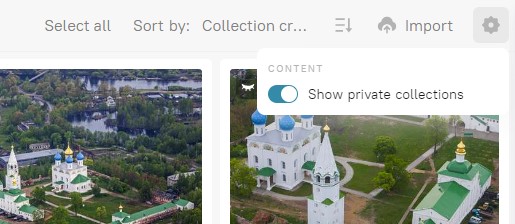
- Filter collections, include and exclude other users’ private collections. To do this, use the filter as shown in the screenshot below.
To create import rule for a single user go to Home > Users > Users. Choose the user by clicking on it, locate the Functional permissions window and repeat the actions above.
Rights to work with linked assets
Read the article about linked assets.
The rights to work with linked assets for a group of users are defined in the Home > Authentication and Authorization > Groups section.
To grant the right, find the desired group in the list, click on it. In the window that opens, in the Functional Permissions section, find content | asset | Can view linked assets and content | asset | Can edit links between assets, select it and click the right arrow to move the rules to the Chosen permissions window.
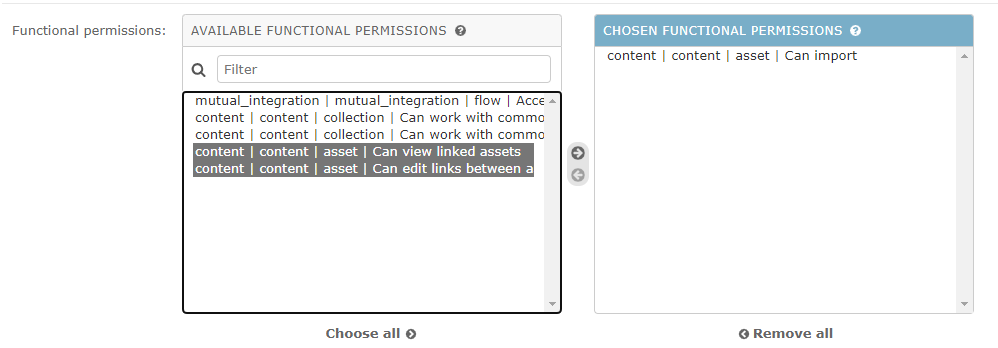
Click Save.
Viewing linked assets gives you the right to view linked assets.
Editing links between assets gives you the right to create links between assets and unlink them.
Rights to work with comments
If the user has the right to work with comments, he can comment on all assets that are available to him.
The rights to work with comments for a group of users are defined in the Home > Authentication and Authorization > Groups section.
IIn the Groups section, select the user group for which you want to configure the rule, in the Functional permissions section, find the comments | comments | comment | Can work with comment rule, select it and click the right arrow to move the rule to the Chosen permissions window.
Click Save.
Right to edit person
If the user has the right to edit persons, they can edit persons’ names, change persons and delete them from the photo.
The rights to work with persons for a group of users are defined in the Home > Authentication and Authorization > Groups section.
To grant the right, find the desired user group in the list. In the Functional permissions section, find Face_recognition | Face_recognition | person | can edit person rule, select it and click the right arrow to move the rule to the Chosen permissions window.
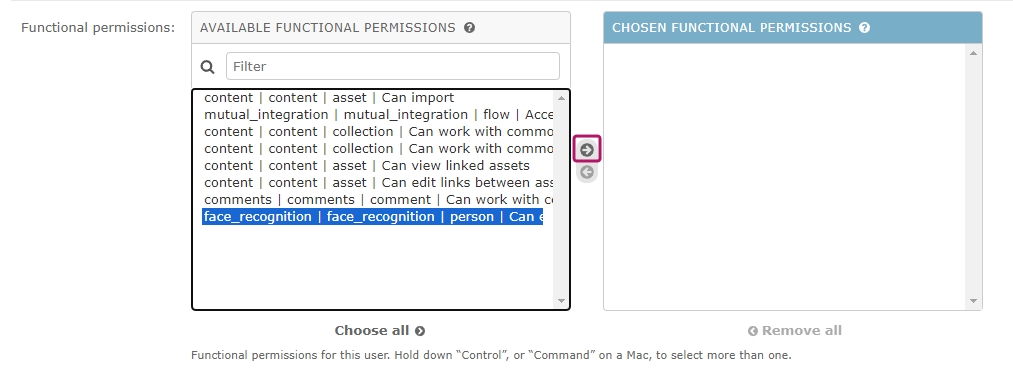
Click Save.
Rights to work with taxonomy
The rights to work with taxonomy for a group of users are defined in the Home > Authentication and Authorization > Groups section.
To grant the right, find the desired user group in the list. In the Functional permissions section, find the ‘content | content | Tree item | Can view empty taxons‘ and ‘content | content | Tree item | Can view asset grouping without taxons‘ rules, select them while holding CTRL/Command, and click the right arrow to move the rule to the Chosen permissions window.
‘Can view empty taxons‘ rule grants the user the right to see empty taxons in the left panel of the workspace, i.e., those to which no viewable assets are linked.
‘Can view asset grouping without taxons‘ rule grants the user the right to see the ‘Assets without taxonomy‘ grouping in the left panel of the workspace.