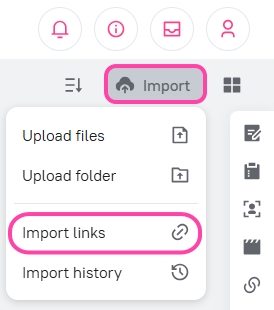
In Picvario, you can create import links and share them with unauthorized users, such as freelance photographers. Using these links, they can upload content to Picvario without having access to the system.
Creating an import link
1. In the Import links section of the right sidebar, click the Create link button.

or
Click the Import button in the top right corner and select Import link from the menu.

2. Set the necessary properties for the link.
- Link name (optional)
- The collection where the assets will be imported to. You can select a collection from the existing ones or create a new one. To select a collection, start typing its name in the field and select the collection from the dropdown list. If a collection with this name does not exist, a button “Create a collection with the name entered name” will appear under the field. Click on it to create a new collection.
- Expiry date (optional). You can create permanent or temporary links. The temporary link will be valid until the date you set.
- Password (optional). Note that the generated password is automatically copied to your clipboard and will not be available for viewing or copying later.

If the properties of the import panel are configured by the administrator, the corresponding fields will be available for filling in when creating the import link as well.
3. Click the Create import link button.
A link will be displayed in the Import links section of the right sidebar. You can copy it by clicking on its address (URL).

Viewing and editing links
The active import links that you have created along with their properties are displayed in the Import links section of the right sidebar. You can:
- Copy an existing link by clicking on its address (URL).
- Change the properties of an existing link, for example, its expiry date, the password or the name of the link. To do this, click
 next to the link name. Click the Edit link button. In the edit form that appears, modify the link properties and click Save. If you do not want to set a password or an expiry date, leave these fields blank. If you click Cancel, the changes will not be saved.
 - Delete the link. To do this, click
 next to the link name. Click Delete. You will be prompted to confirm the deletion — click Delete. This link will then no longer be valid. When the previously sent link is clicked, the user will see a 404-error page.

When clicking the link, the user will see the import window and the email address of the user who shared the link.

The user can drag and drop files or click the import window and select files from their computer to start downloading. After the processing of the files is completed, a notification about the number of downloaded files will appear along with the Upload more button.
