You can import individual files to the system as well as folders with files in them.
Each time you import, a private collection is created in the system that includes all the imported assets.
By default, the system has limits to the size and number of importing assets in one task:
- the maximum size of one single asset shouldn’t exceed 10 GB
- the maximum number of importing assets at a time — 100 assets
You can change these restrictions in System settings — Options. The System setting section is only available for the users with admin rights.
You can import files of any format into the system.
When importing unsupported file formats, asset thumbnails are not created, and they cannot be viewed directly in the system; however, they can be stored in the system in the same way as files in supported formats. They can also be downloaded.
Such assets have a «stub» indicating its format:
How to Upload Files
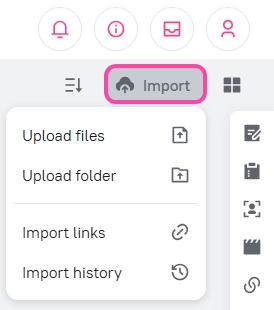
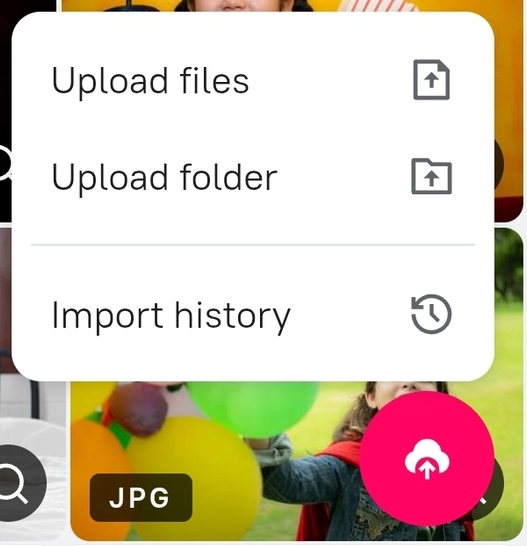
- Click the Import button in the top right corner of the screen.
- In the dropdown list, select one of the options:
- Upload files – opens a standard window for selecting one or more files on your computer.
- Upload folder – opens a standard window for selecting a folder on your computer. All files from this folder will be added to the upload queue.
- The following buttons will also be available under the Import button:
- Import link – opens a window for creating an import link.
- Import history – opens the «Import History» page with a list of your completed imports (administrators see imports of all users). Read more about this later in this article.
After selecting files or a folder, the import window will open.
Import Window
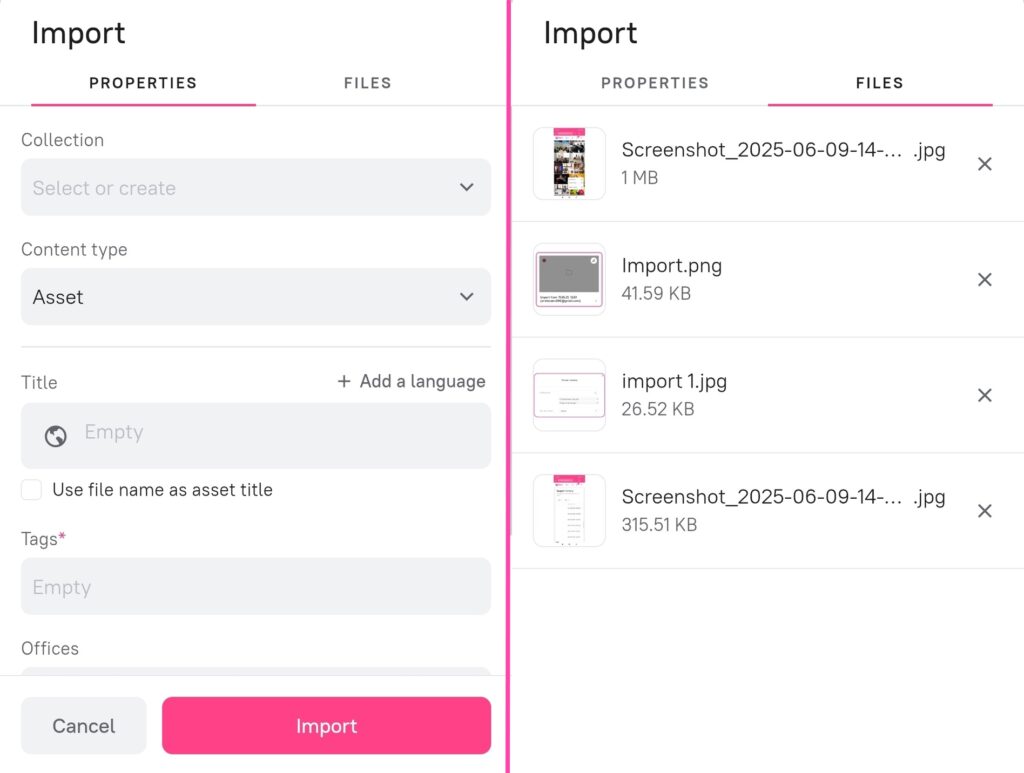
The import window consists of several areas:
- Left panel (Properties): Here you can specify common properties for all uploaded files.
- Right panel (Files): This displays the list of uploaded files with their status.
- Control buttons: At the bottom of the window are buttons for managing the import process.
Filling in Properties
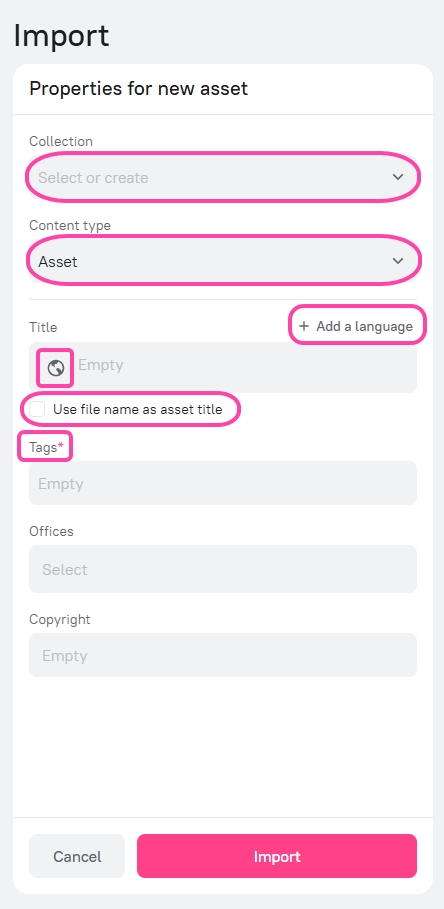
In the left panel, you can:
- Select or create a collection:
- Click on the Collection field to activate it.
- Start typing the name of an existing collection to select it from the list.
- Enter a new name and press Enter to create a new collection.
- You can select multiple collections.
- If no collection is selected, assets will be imported without being linked to a collection.
- Select content type: If multiple content types are configured in the system, select the appropriate one from the list.
- Fill in properties: Properties available for the selected content type are displayed. Fill in the required fields.
- Required properties are marked with an asterisk (*). The Import button will be inactive until all required fields are filled.
- Multilingual properties: For text properties with support for multiple languages, you can:
- Select a language from the list by clicking on the planet icon (default) or on the currently selected language.
- Add a value in another language by clicking Add language.
- Delete a language by clicking the trash can icon next to it (available if more than one language is added).
- Use filename as asset title: For the
titleattribute, an option for automatic population from the filename is available.- Activate the Use filename as asset title toggle. The input field will become inactive.
- This option is only available if multiple language versions have not been added for the
titleattribute.
File List
The right panel displays a list of files added for import with the following upload statuses:
- Progress bar: Displayed during file upload. If duplicate checking is enabled, progress will stop at 99% until the check is complete.
- Spinner: Displayed after the file is uploaded, while its thumbnail and proxy versions are being generated.
- Thumbnail: Displayed when the file is uploaded and all necessary versions are generated.
- If the file is intended for a Check-in operation (returning a checked-out asset), a special icon with arrows will be displayed on the thumbnail. Hovering over it will show the tooltip «File for returning a checked-out asset.»
- If the file is a duplicate of an existing one in the system, a duplicate icon will be displayed with the tooltip «Duplicate detected — it will be ignored.»
- Error icon: Displayed if an error occurred during file upload.
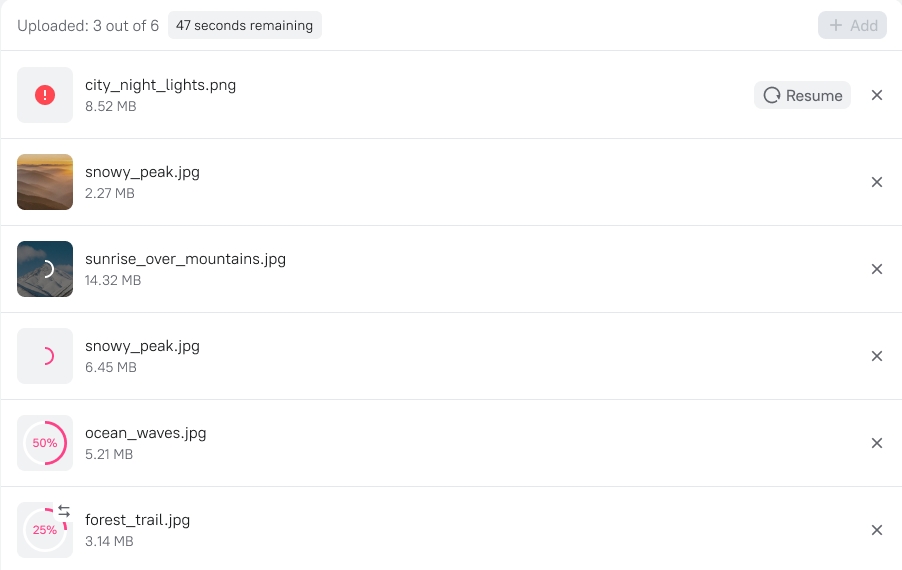
Each file also has the following parameters:
- Filename and extension.
- File size.
- «X» (Delete) button: Appears when hovering over the file. Click to remove the file from the import list. Associated uploaded data will be deleted from the system.
- «Resume» button: Appears if an error occurred during file upload. Click to try uploading the file again.
Files are sorted as follows:
- Files with upload errors are displayed first.
- Then, all other files.
- Within each group, files are sorted by the time they were added (earliest first).
At the top of the import window, there are counters:
- Uploaded: X of N: Shows the number of fully uploaded files (X) out of the total number of files in the import (N).
- Remaining time: Approximate time until all files are uploaded. Displayed while there are files in the process of uploading without errors.
During the import process, you can add new files to the upload queue:
- Click the Add button at the top of the file list.
- Select Upload files or Upload folder.
- You can also drag and drop files or folders into the file list area.
Limitations:
- The total number of files in one import should not exceed the value of the «Maximum number of files when importing via web browser» setting.
- The size of each file should not exceed the value of the «Maximum file size when importing via web browser» setting.
- If limitations are violated, you will see a corresponding notification.
![]() The Add button and drag-and-drop functionality are available as long as the import is not confirmed and is not in the final stage.
The Add button and drag-and-drop functionality are available as long as the import is not confirmed and is not in the final stage.
Managing the Import
At the bottom of the import window, there are several buttons to help you manage file uploads.
- Collapse and Expand:
- If you want to temporarily remove the import window from the screen but not interrupt the upload, click the Collapse button (looks like a dash or a downward arrow at the top of the window). The import window will disappear, and a small panel will appear at the bottom of the screen. This panel shows that the import is still in progress. To reopen the import window, click the Expand button on it. The Collapse button works until the import is finished.
- Cancel:
- If you change your mind about importing files, click Cancel. The import window will close, and all files you added (even if they have already uploaded or were still uploading) will be deleted from Picvario.
- Import:
- You can click this button at any time, before or after files are uploaded.
- This button will become bright and active as soon as you fill in all required fields (marked with an asterisk *) and there are no errors in the file list. If the button is inactive (dimmed), hover over it with your mouse – a tooltip will appear explaining the reason for inactivity (e.g., «Fill in the required fields»). When the button is active, hovering over it will show the tooltip: «Clicking will complete the import automatically after all files are uploaded.»
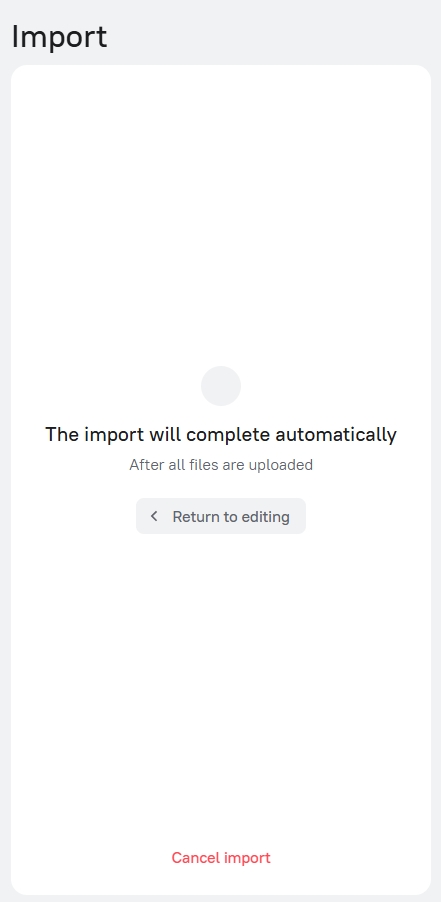
- When you click Import:
- You confirm that you want to start the import. The import window will remain on the screen. In the left part of the window, where you filled in the properties, information that the import has started will appear. You will see a progress bar and the message «Import will complete automatically after all files are uploaded.»
- Two new buttons will appear on this screen:
- Return to editing: If the import is not yet nearing completion, you can click this button to change the file properties again.
- Cancel import: Works the same way as the main «Cancel» button – stops the import and deletes the files.
- If problems occur with any files during upload, you will see an error message.
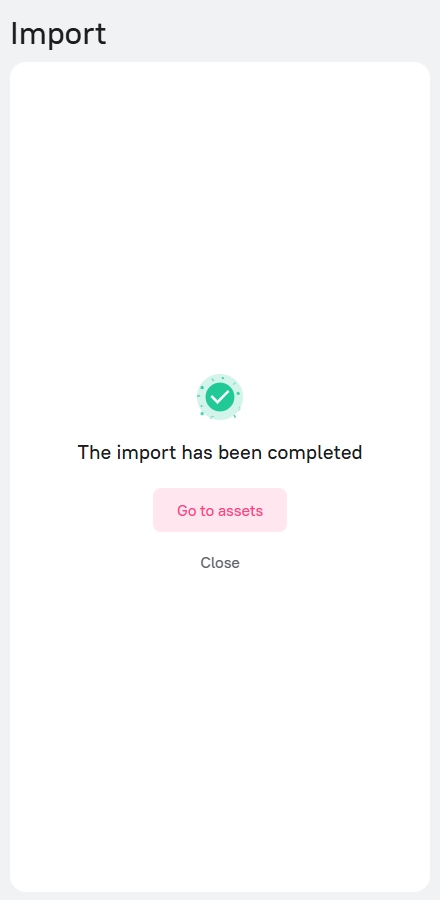
- When the import finishes:
- After all files are successfully uploaded and processed, the message «Import completed» will appear in the left part of the window.
- Two buttons will be available to you:
- Go to assets: Click to close the import window and immediately see the uploaded files in the asset feed.
- Close: Simply closes the import window.
Parallel Imports
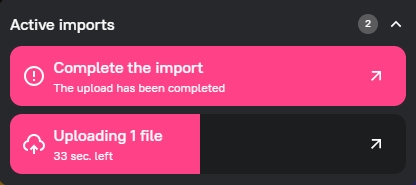
You can run multiple import processes simultaneously. Each new import will open in its own window.
If you have active (unfinished or completed but not closed) imports, a banner will be displayed at the bottom of the screen:
- One active import: The banner shows the status of the current import (uploading, awaiting completion, completed, error) and an Expand button (or To assets / X for a completed import).
- Multiple active imports: The banner displays the text «Active imports» and a counter of their number. Clicking on the banner expands a list of all active imports with their statuses and control buttons for each. The expanded state of the banner is remembered.
Checks During Import
- Maximum number and size of files: The system checks files for compliance with limits both during initial selection and when adding to an already open import window.
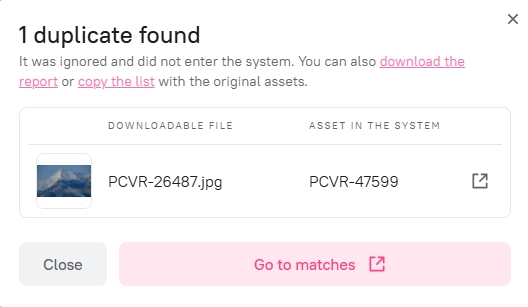
- Duplicates:
- The system checks uploaded files for duplication with existing assets and files within the current import.
- If duplicates are found, after the import is completed (or when opening a completed import window with duplicates), a «Duplicates detected» window will appear. It will list the uploaded files and their corresponding duplicate assets in the system.
- You can go to view these assets or download a report/copy the list. Duplicate files do not create new assets.
- Filename match (for auxiliary files):
- If the
check_import_name_matchoption is enabled in the workspace settings, a toggle If names match, add files as auxiliary to existing assets instead of creating new assets will appear in the left panel of the import window. - If the option is active, and the name of the uploaded file (without extension) matches the name of the original file of an existing asset (to which you have rights to edit and view auxiliary files), then the uploaded file will be added as auxiliary to the found asset, rather than creating a new one.
- If the
- Check-in:
- The system automatically identifies files intended for the Check-in operation (returning a checked-out asset). A special icon will be displayed on the thumbnail of such a file in the list.
- If you try to upload a second file for Check-in of the same asset within a single import, a notification will appear, and the second file will not be added.
- Automatic deletion of unconfirmed files: If an import was not confirmed (the «Import» button was not clicked) within 24 hours from its start (addition of the first files), all files uploaded within this import will be automatically deleted from the system. If you try to confirm such an «expired» import, a notification will appear stating the need to upload the files again.
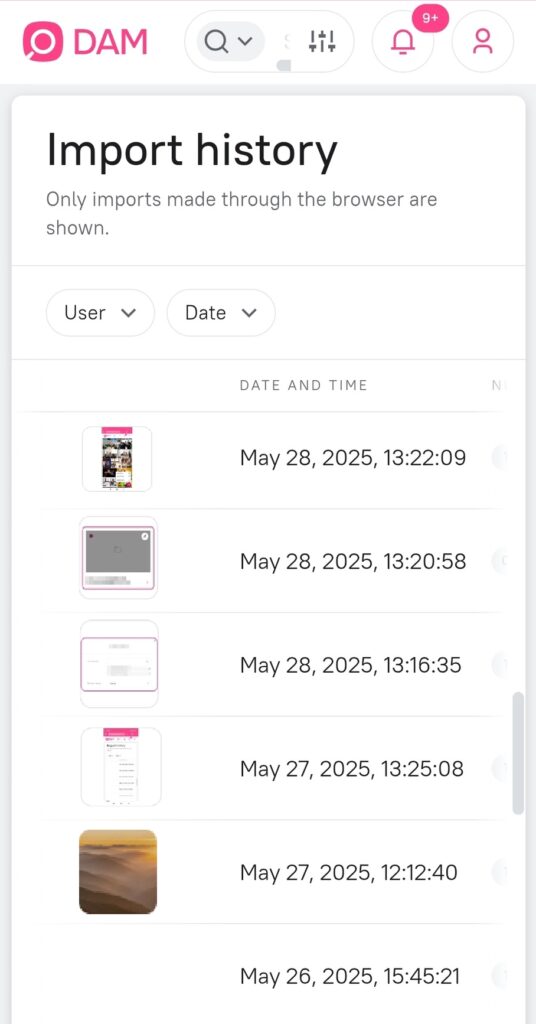
Import History
All completed imports (except imports by link, from external sources, and storages) are saved in the history.
- Click the Import button.
- In the dropdown list, select Import history.
- The «Import History» page will open with a list of your completed imports (administrators see imports of all users).
The following information is available for each import in the list:
- Thumbnails of the first 5 assets from the import.
- Date and time of import completion.
- Number of files added to the system as part of the import.
- User (for administrators) – author of the import.
On this page, you can perform the following actions:
- Sorting: By default, imports are sorted by completion date and time (newest first).
- Go to assets: Click on any row in the list to go to the asset feed, filtered by this import.
- Filters:
- User (for administrators): Filter by import author.
- Date: Filter by import completion date range.
- Clear: Resets all applied filters.
At the bottom of the list, a note may be displayed: «Earlier imports may be located in ‘Collections’.»

Mobile Version
The import functionality is adapted for mobile devices:
- «Import» button: The «Import link» option is missing from the dropdown list.
- Import window:
- Instead of left and right panels – Properties and Files tabs.
- Missing: collapse button, uploaded files and remaining time counters, «Add» files button.
- Import history: The interface is adapted for mobile devices.