A major update affecting interface changes launches the «Linked Assets» and the «Supporting Files» features.
Interface Updates
We are constantly working to improve the design of the interface, trying to make it prettier and more intuitive.
We want to emphasize that the redesign has not changed the system’s logistics; it is a solution for convenience.
We have recorded a video on using the new interface to make your workflow more comfortable. Also, we will reiterate the most crucial interface changes in this article.
Most important interface changes
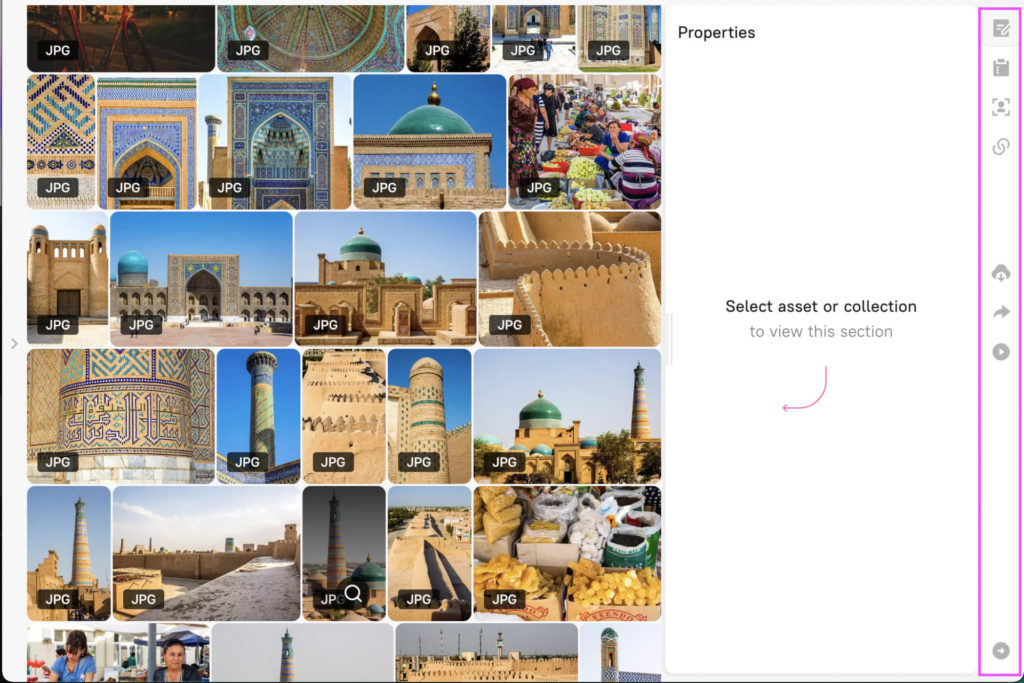
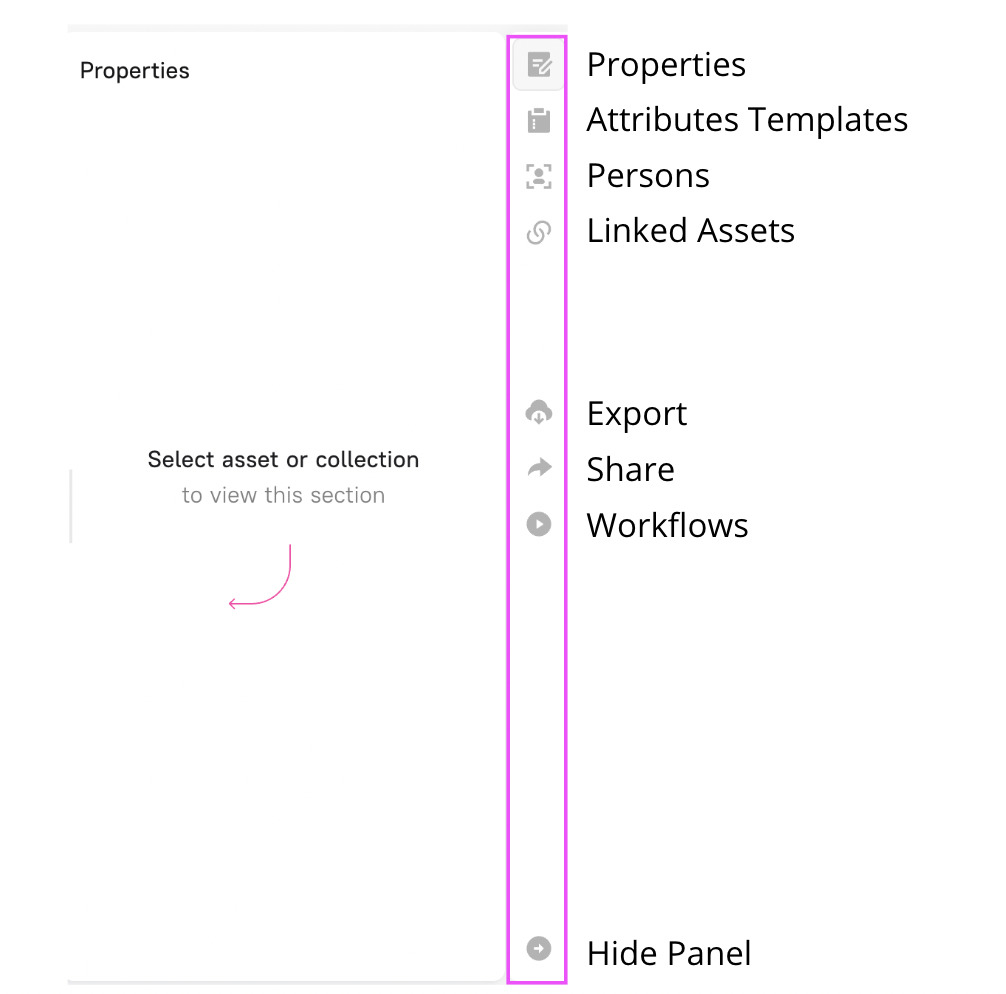
1. Added a menu on the right, with icons highlighting the individual sections of the properties panel (Hints when hovering)
For assets: Properties (works to bring up the right sidebar), Property Templates, Persons, Linked Assets, Export, Share, Workflows, Hide/Show Panel.
For Collections: Properties (works to bring up the right sidebar), Share, Hide/Show panel.
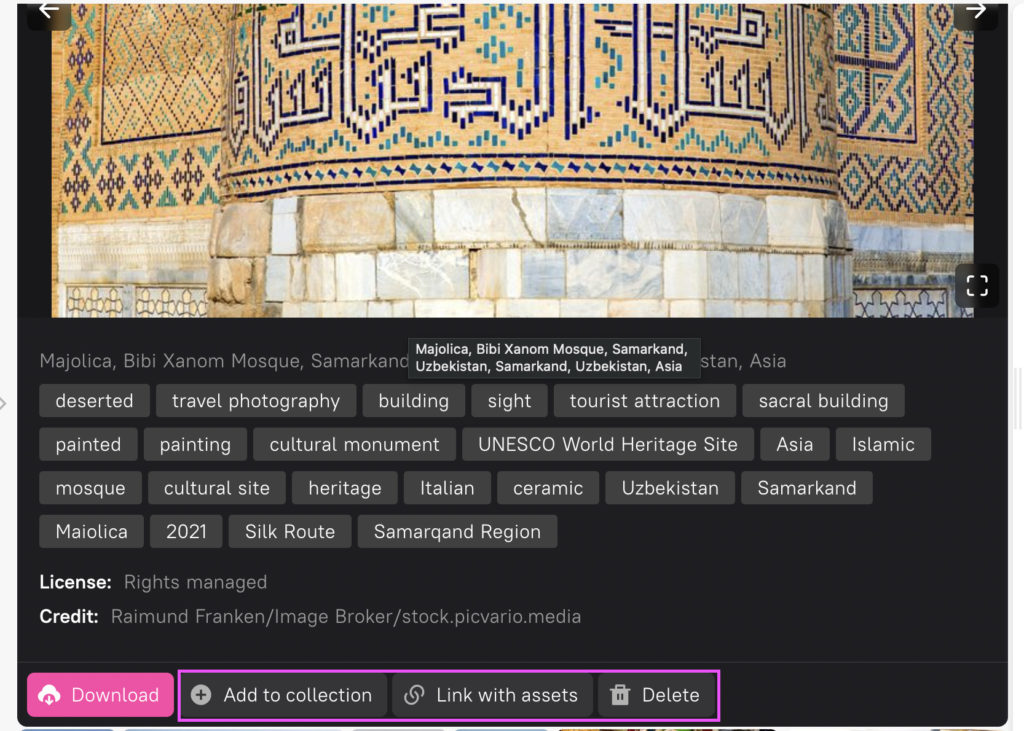
2. The “Delete Asset” and “Add to Collection” buttons have been moved to the asset preview panel. When you open the left and right sidebar, depending on the screen size, it may be in the context menu under the «…» sign.
Comparison:
Before the update, the «Delete Asset» and «Add to Collection» buttons were in the asset’s properties panel, making them difficult to access.
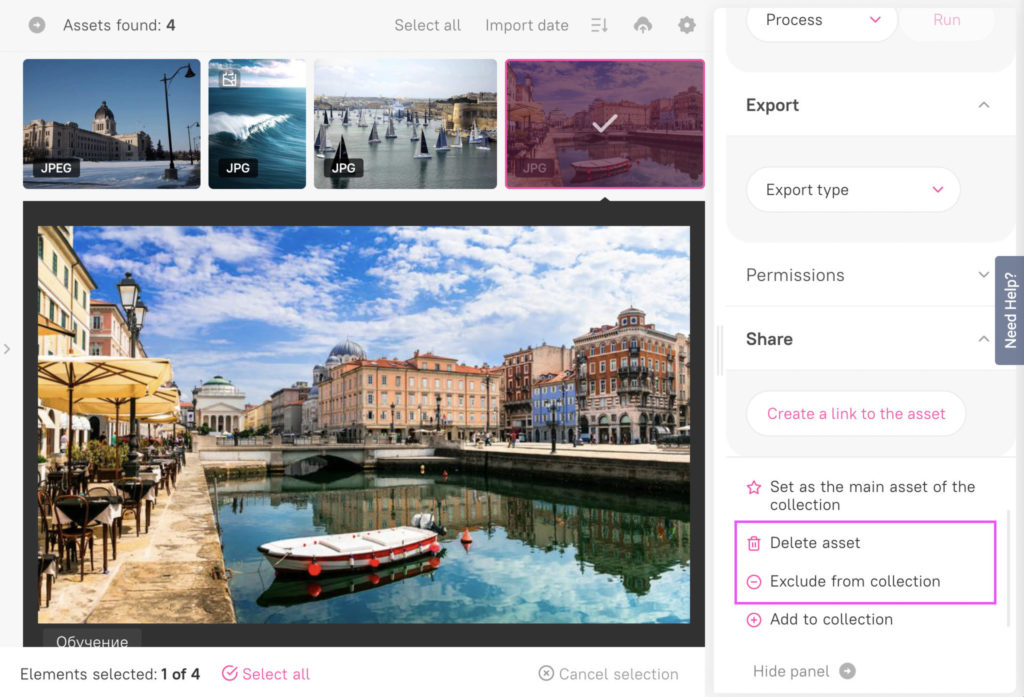
After the update, the «Delete Asset» and «Add to Collection» buttons are on the preview panel of the asset directly in the user workspace.

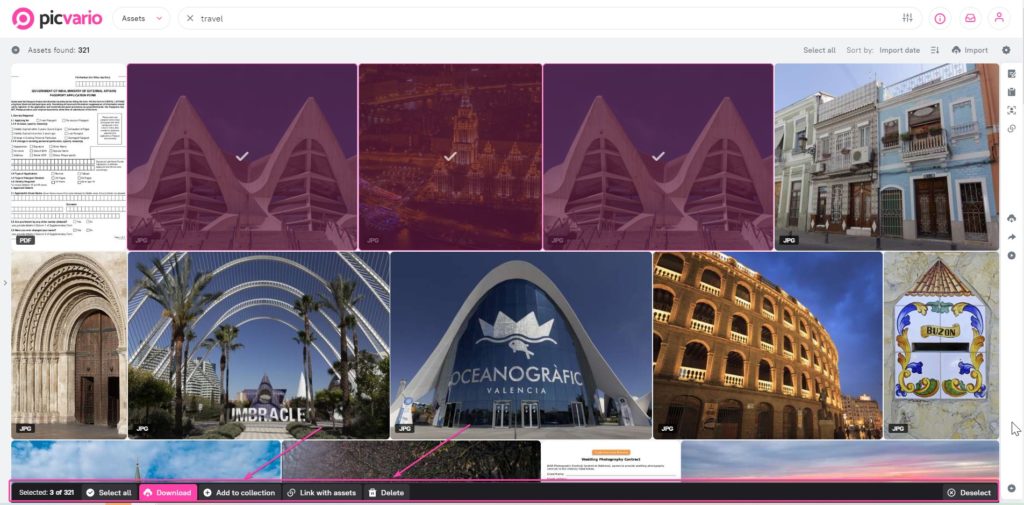
3. To «Delete» or «Add Collection» multiple assets at once, specify the desired action in the bottom panel that appears.
4. To create a new collection, select an asset, open the Collections tab on the right sidebar and click Create Collection at the bottom of the screen. The process for working with multiple assets is the same.

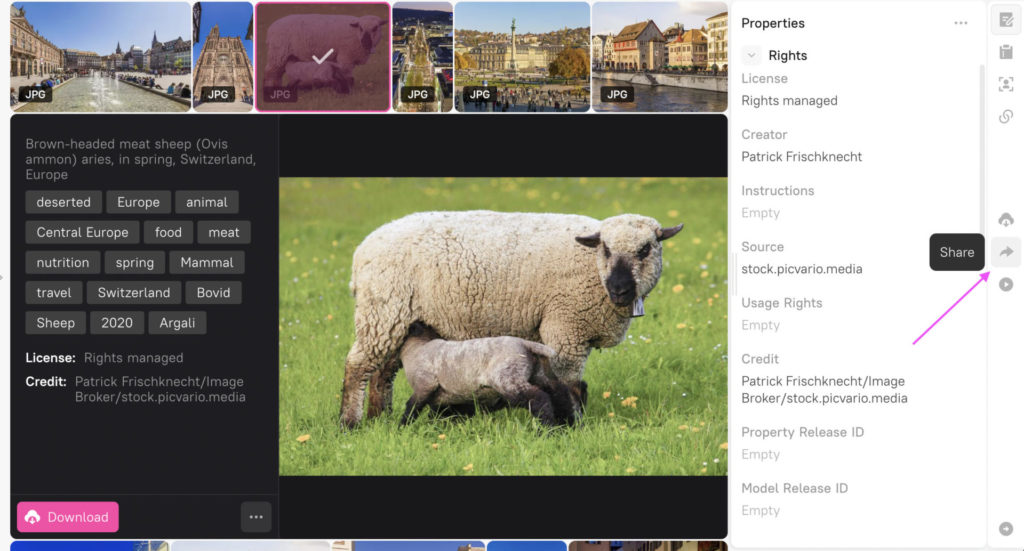
5. To create a link to an asset or multiple assets, you must go to the Share tab on the right-hand side panel and create a link by clicking the button in the lower right corner of the screen.
6. The additional free space has been optimized for a better metadata view.
Before, inefficient use of workspace due to empty spaces.

After, the workspace is maximized with properties and avoids unnecessary scrolling.

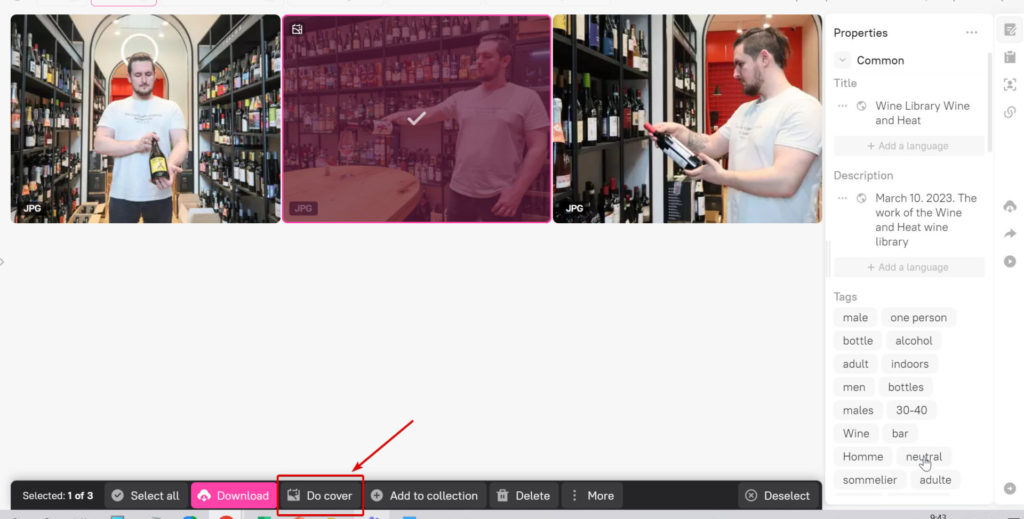
7. The button to make an asset the cover of a collection has changed. From “Set as the main asset of a collection” to “Make Cover” and is available in the bottom panel and in the preview mode.
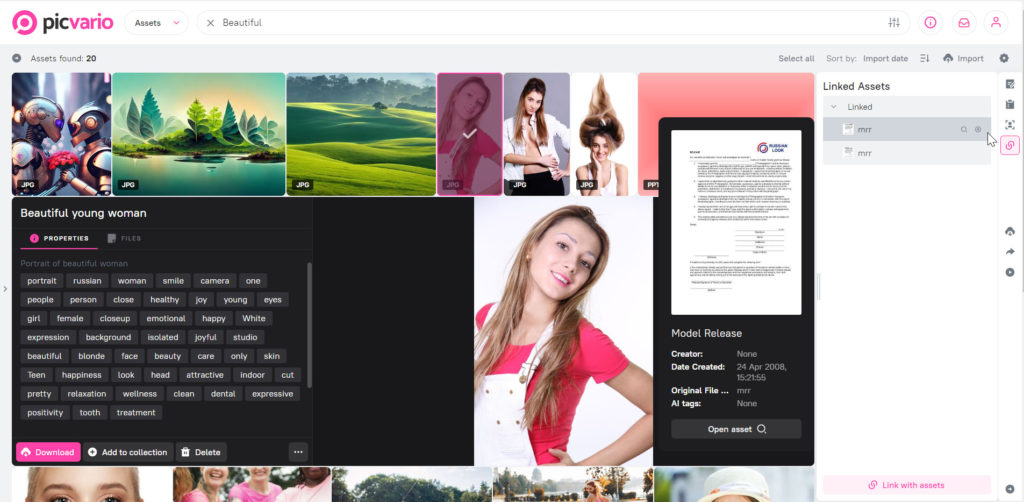
Linked Assets
The LINKED Assets feature is another tool for organizing content. Let’s break it down with an example:
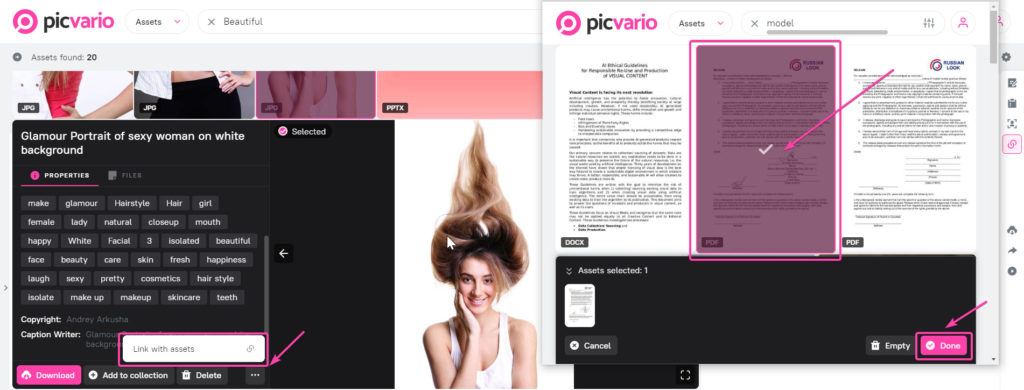
A photographer has completed several photoshoots with an advertising model. In order to sell or use the images for advertisement, the model must sign a consent — Model Release Form. After uploading the photos and the document into the platform, you can create an association between them, which we’ll call «Release.» From now on, by selecting a photo in the system, the user can see the connection between an asset and the corresponding document in the panel. They allow for easier access to usage rights associated with each image.
You can create different types of links in the system. The rights of users to view and edit links are differentiated.
How to combine linked assets?
1. You can link assets in two ways:
- From the preview panel of the asset, when you select an asset,
- From the bottom panel, when you select multiple assets.
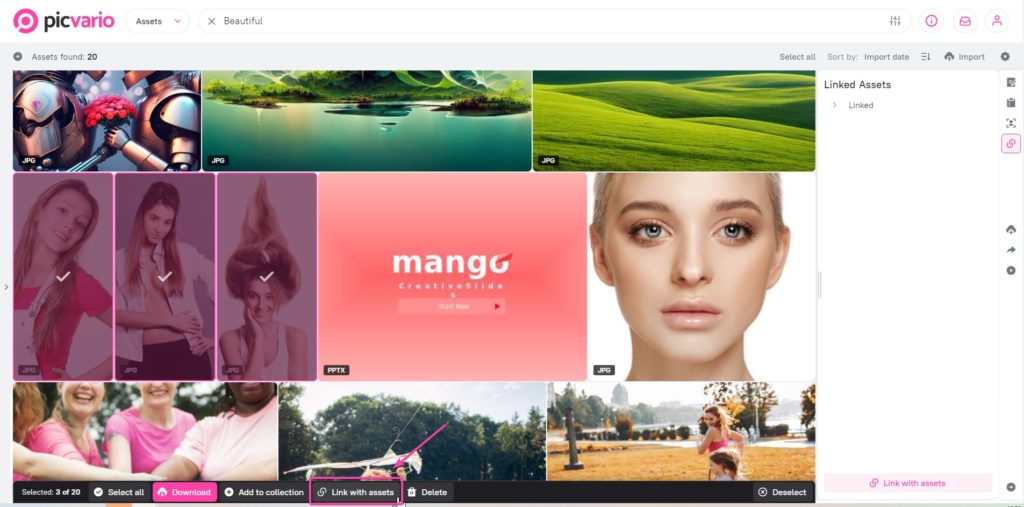
1. Select one or several assets
2. From the context menu, select Link Assets
3. In the window that appears, select the assets you want to link
4. Set the linkage. The default linkage type is Linked
5. Click “Done.”
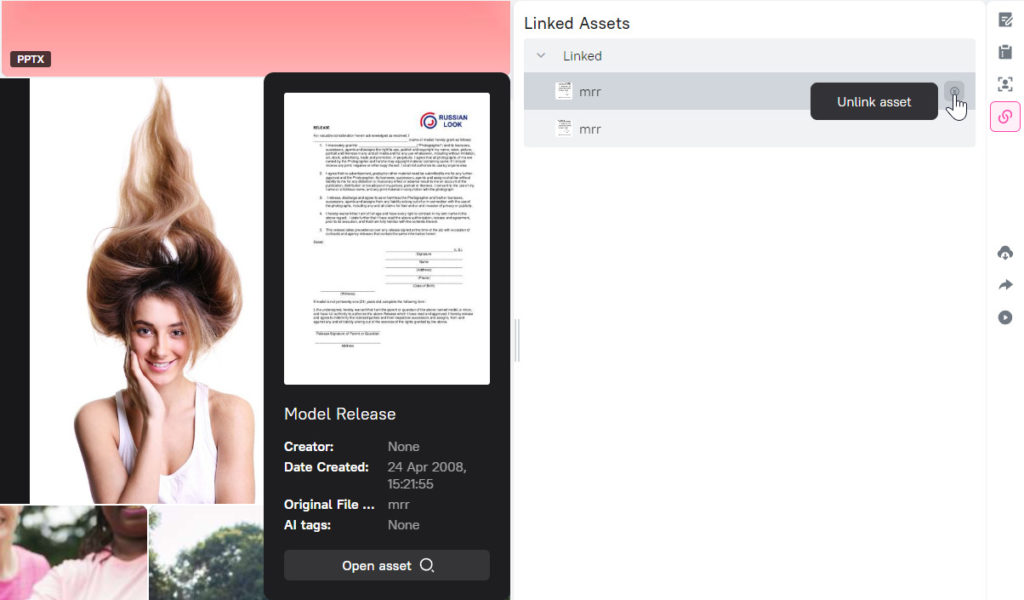
How do I break the connection?
1. Click the Linked Assets section in the right sidebar
2. Locate the asset you want to unlink
3. Click the “X” next to the asset. This will disconnect the link.
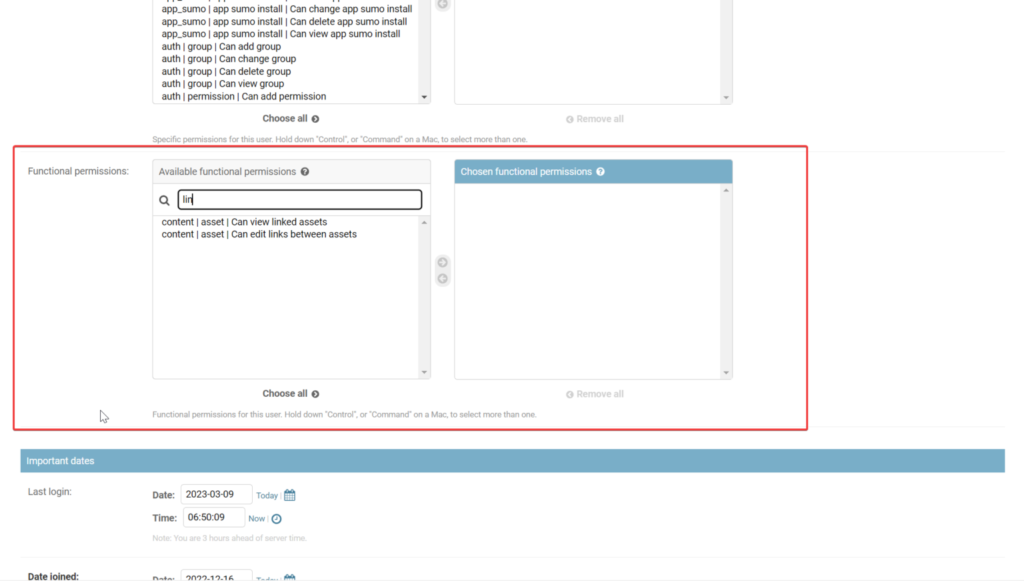
How do I configure permissions?
There are two new rights for users and groups in the administration panel (in the “Functionality permissions” table under “Home › Users › Users” and “Home › Authentication and Authorization › Groups”):
- Can view linked assets
- Can edit links between assets (May edit links between assets)
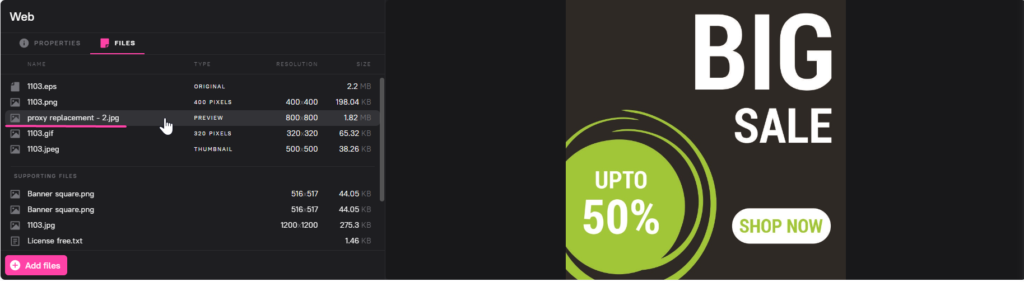
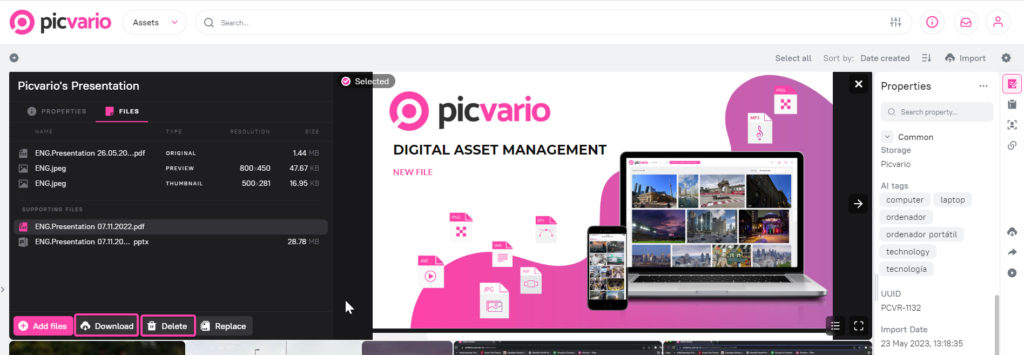
Supporting files
Supporting files is a function in Picvario that allows you to work with auxiliary files. Supporting files are not assets per se, i.e. they do not contain metadata and are not indexed in searches. They are any variations or additions to the main asset that have no independent relevance without it.
Examples of use:
- An asset in .RAW format needs to be accompanied by an auxiliary file in .XML
After editing a RAW file in Adobe Photoshop, the RAW file itself is not changed in any way. The editor stores the entire editing history in the accompanying XML file. When a RAW and an XML file are stored together, the program will open the edited file. Without the XML, only the original RAW will be available without any changes. Thus, it is important to accompany the .RAW format with an auxiliary file in .XML.
- Clip audio tracks and .XMP metadata to work in the video editor
When working on a film project in Adobe Premier, there is a set of auxiliary files, such as the .XMP metadata accompanying file, audio tracks, etc. These are examples of auxiliary files that do not work without the asset.
- Design materials in different versions
Layout designs are used both for printing and for distribution in the web environment. The CMYK colour model is used for printing, while the RGB colour model is used for digital representation. RGB will be displayed correctly on a computer screen. A file prepared for printing can be stored in the system as an auxiliary file.
- Presentations in different formats
Presentations are most often distributed in .PDF format, which is the original asset per se with recorded metadata for storage and searchability. However, for designers and marketers, it is important to store the source in .PPTX — in which case it would be an auxiliary file.
Working with Supporting files:
- The metadata of the downloaded auxiliary files have no effect on the metadata of the asset.
- When replacing an original asset, the link previously created will remain valid and lead to the new original.
- Auxiliary files are stored in the local Picvario storage, regardless of where the original asset is stored. When replacing an original one from an external storage, the new file will also be in the external storage and the previous file will be transferred to the Picvario local storage as an auxiliary file.
- The process of download files can be seen in the list of active processes marked as Auxiliary file download.
- When multiple files are downloaded, an archive is created.
- The downloading of auxiliary files is shown in the export statistics (export type Downloading, for auxiliary files PROXY = Supporting file)
Linked assets and Supporting files. What’s the difference?
Linked assets are assets with metadata, that have a relationship to each other and need to be searchable.
The most obvious example is using a content creation contract and a model release: these can be thousands of images from photo shoots that need to be linked to one or more model releases. Also liked assets can be assets in different file formats within the same task, project, etc.
How to work with supporting files in Picvario
Uploading a file to an existing asset
- Select the asset to which you want to add an auxiliary file.
- Go to the Files tab and select Add File.
- Select the file from your device that you want to upload as an additional file.
Note:
- The metadata of the uploaded files has no effect on the metadata of the asset.
- Supporting files are sorted by date and time of import, from newest to oldest.
- Supporting files are stored in the local Picvario Storage, regardless of where the original asset is stored.
- The uploaded files falls under into active processes with the event «Supporting files upload».

How to add supporting files to an asset
Replacing a file
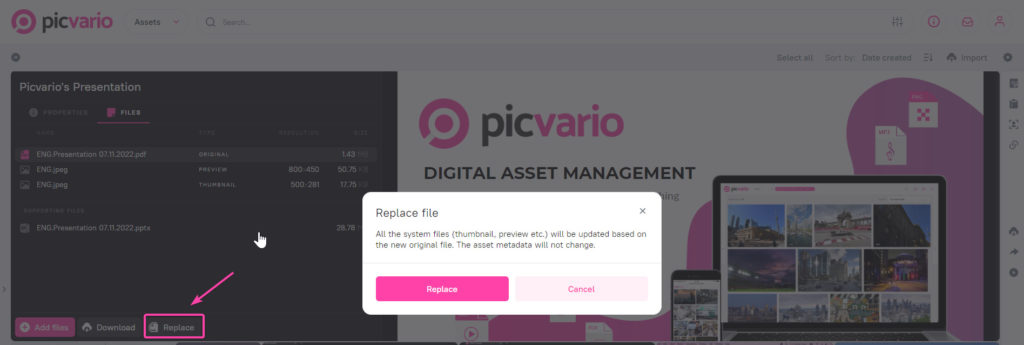
Replacing an original file
To do this, select the file as «Original» and click the «Replace» button. This will move the previous file to auxiliary files, and the new one will retain all the metadata and regenerate proxies.
Note:
- The link create for the previous asset will remain valid and lead to the new file.
- If the user replaces the original from an external storage, the new file will also be in the external storage and the previous file will be moved to the local Picvario storage as an auxiliary file.
Proxy versions after replacing the original are regenerated, and the old file is moved to the «Supporting files» block.
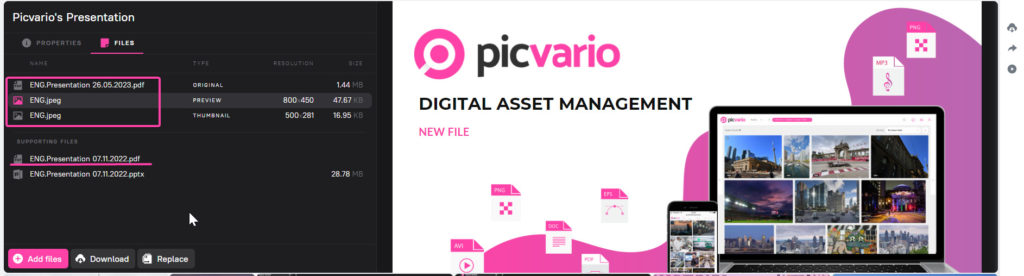
Proxy versions after replacing the original are regenerated, and the old file is moved to the «Supporting files» block.
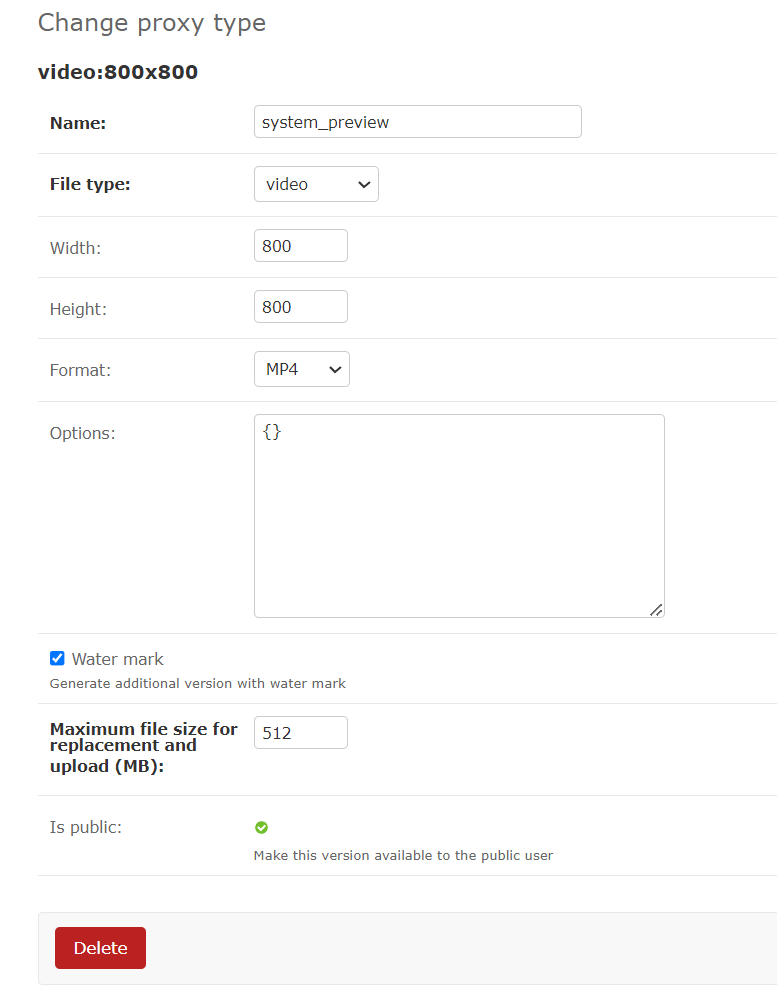
Replacing a proxy version
Replacing a proxy version This feature gives you the ability to edit the asset’s preview. This is especially relevant for audio tracks and videos: since the proxy is generated automatically, sometimes you need to adjust the asset’s cover manually.
Before: the generated preview of the asset — source layout .psd Adobe Photoshop
After: an informative cover
There are file format and size limitations for proxy replacements. By default, the maximum limitations of proxy versions, in MB:
- for system thumbnail = 8
- for system thumbnail images = 64
- for system video preview = 512
- for system full screen = 128
The default values can be edited in the admin panel on Home ‘ Proxy_File_Options ‘ Proxy types. However, we do NOT recommend to change the default values, it may result in longer wait times when loading the assets feed.
Downloading and deleting supporting files
When downloading or deleting, it is possible to work with a single file or with several files. For a mass selection, press the «Ctrl»/»Cmd»/»Shift» key. Then select «Download» or «Delete» button.
Please note:
- When downloading multiple files, an archive is created.
- Downloaded auxiliary files are reflected in the export statistics (export type «Downloading», for auxiliary files PROXY = «Supporting file»).

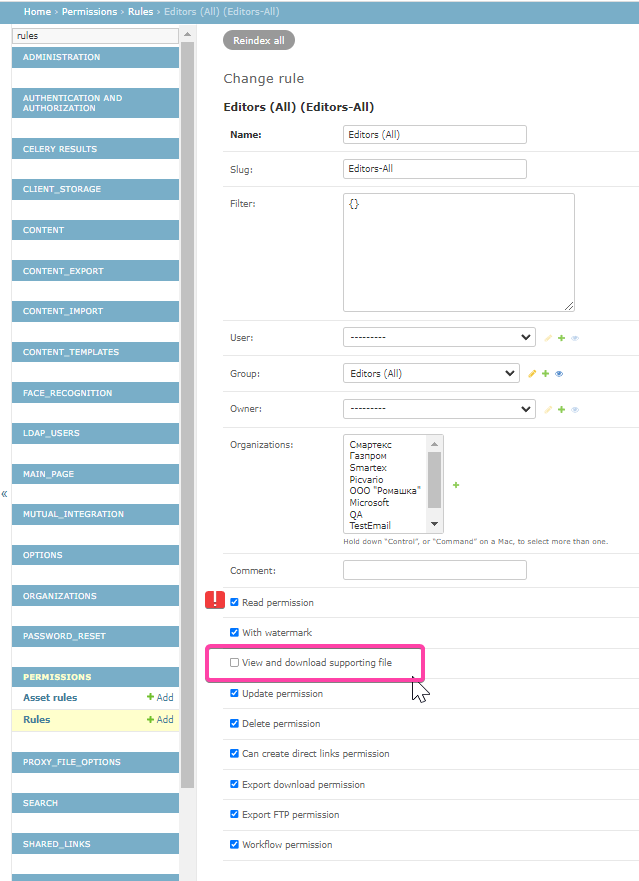
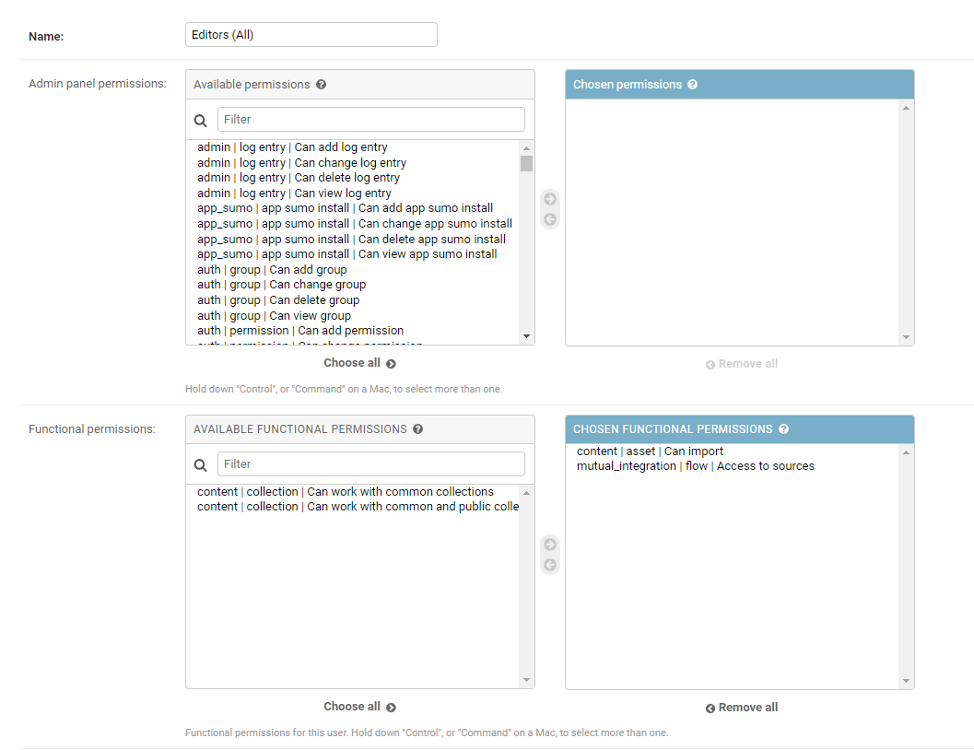
Customizing permissions
In the Django admin panel, under Home > Permissions > Rules, there is a new rule «View and download supporting file», active only when «Read permission» is active. This rule allows you to view and download supporting files. Supporting files can be uploaded by users who have these permissions: «Update permission» and «View and download supporting file», the import permission may not be active. File replacement is available to users with the «Update permission».
Collection permissions
Picvario’s release has updated access rules for working with collections. The new release gives permission to work with the following:
- common collections,
- common and public collections.
The permission can be set up for both a group and an individual user.
The permission setting for a group is controlled in the Django admin panel: Home → Authentication and Authorization → Groups.
Permissions:
- Working with common collections,
- Working with common and public collections
Actions that can be taken with different settings:
Owner of a collection WITHOUT BOTH PERMISSIONS:
- You can create and work with your collections,
- You cannot change the collection to public or common,
- You cannot add or remove assets from common and public collections,
- Cannot change the main asset in common and public collections.
Owner of a collection WITH common PERMISSION:
- You can make your collection common,
- You can work with common collections (edit properties and delete),
- You can add or remove assets from common collections,
- You can change the main asset in common collections,
- You cannot change the collection type to public.
Owner of a collection WITH common AND PUBLIC PERMISSION:
- You can make your collection public or common,
- You can work with common collections (edit properties and delete),
- You can work with public collections (edit properties and delete),
- You can add or remove assets from common and public collections,
- You can change the main asset in common and public collections.
The administrator can:
- See all collections, including other users’ private collections,
- Work with all collections,
- Filter collections, include and exclude other users’ private collections. To do this, use the filter as shown in the screenshot below.

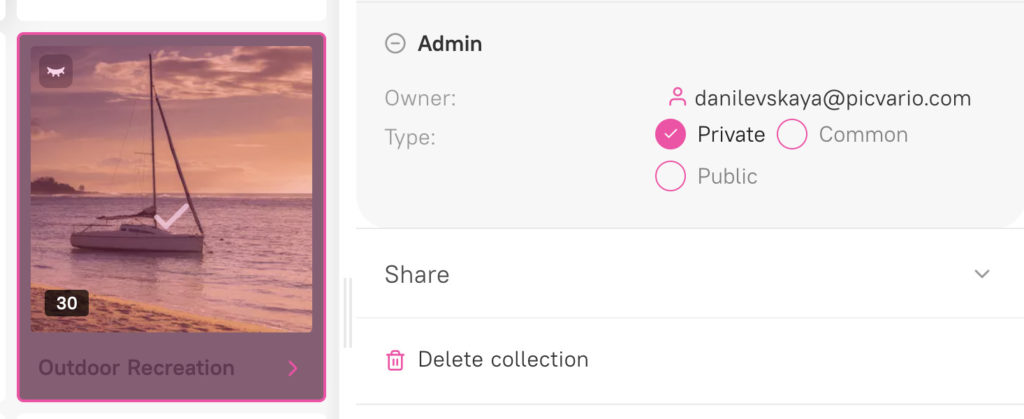
The update has affected the interface element that shows the collection type. Previously, there were two switches in the collections properties panel – Common and Public. Now, there is one property with the choices of Private /Public /Public.
Previous:

Current: